Here To Help
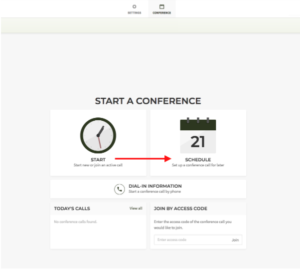
After signing into your account, please hit the Schedule Icon, represented as a Calendar on your screen. (Screen 1)

This will prompt a new screen to appear, pictured below. (Screen 2)
From this screen (Screen 2), you can choose when and where you would like this conference to happen. It also specifies the nature of the meeting, i.e the agenda behind the discussion.
Recurring meetings
If you are looking to schedule a meeting that reoccurs, such as a weekly team building meeting, you can set this function up by selecting “set on repeat“. This will allow you to specify when and how frequently you would like to have these meetings. (Screen 3)
Timezone Troubleshooting
To add more than one timezone to the meeting details, please select “Timezones” on the first screen that appears in the scheduling process, using the Plus Sign every time you need to add a new Timezone.
As you decide the start time within your own timezone, Callbridge will list the other time zone options for the involved parties, to aid in determining the best time for everyone. (Screen 4)
Security
If you seek to add another element of security to your conference, please select the Security Settings found at the bottom of the webpage.
This will require you to choose a one-time access code, and/or a Security Code. These can be generated at random if you do not desire to use your Default. (Screen 5)
Contacts
The following page permits you to select the Contacts with which you seek to connect. This list does not determine the final party involved in your conference, as an email invitation is not necessary to take part in the final conference.
Using the Add Contacts option, you can input new contacts along with those you already possess. (Screen 6)
If you wish to invite contacts already present in your address book, simply hit “Add Contact“.
You may also remove participants by selecting the “Remove” option next to the contact desired.
Select the dial-in numbers you would like to utilize in the invitation. Both US and CAD numbers can be used on the invitation. You may also search for specific numbers using the Search Bar located at the top of your screen. (Screen 7)
If you are experiencing any difficulties or need to start over, simply hit the Back button to review the Date, Time, Subject and Agenda of the meeting. Assuming you do not want to record the conference or select any international or toll free numbers, please select Next.
Confirmation
After clicking the final Next button, you will witness a confirmation window appear where you can review all details input. Once you are happy with everything, select Schedule to confirm the reservation. (Screen 8)
A confirmation email will then be sent to you; your participants will receive invites by email with the aforementioned conference details.


